
 |
| Paper bag album 1 |

We
all know the small brown paper lunch bags that come in different sizes
and are sold in packs of 50 or more for a economical prize. What can we
create with them? I will give you some ideas. For our first project you
will need any paper scrap you have around and some embellishments, that
can be ribbons, buttons and flowers.
Para este proyecto se pueden utilizar los siguiente:
Cintas,perlas flores,pega con brillo,brads,botones
Ribbon, pearls,flowers,stickles,brads,bottons
Papel de diseño y cardstock
Designer paper and cardstock
(puedes usar los sobrantes de otros projectos)
(any leftovers from other projects)
(any leftovers from other projects)
Pega o adhesivo fuerte
Strong glue or adhesive
Vamos a crear un mini album utilizando solo de 6 a 8 bositas. Primero existen varias manera de doblarlas,yo prefiero doblarlas por la parte que hace la base de la bolsita. Doblas dos y vas a pegarlas juntas utilizando la parte de la base (utilizar un adhesivo o pega fuerte). Yo utilize el siguiente video en youtube para el hacer mi album: (gracias Kathryn)
We are making our album using 6 to 8 paper bags. There is a lot of ways to assemble the album. I just folded them on the bottom part and glue both bottoms together ( use a strong glue o adhesive).
I used the youtube video (link above) to put together my album. (Thank you Kathryn)
Despues de pegar todas las bolsitas ya esta tu album listo para decorar a tu gusto o el tema que desea. Prepararlos y decorarlos no toman tanto tiempo y son buenos para regalar para cualquier occasion.
After assembling you album you can now decorate it. They are so easy and make great gifts for any occasion.
 |
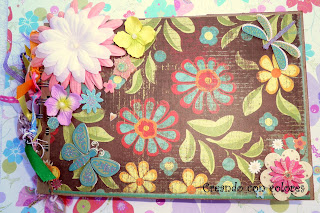
| Portada - Cover album 1 |

In the bag's opening you will place a tag, using cardstock. Cut a piece of cardstock the size of the bag, so it fit inside the bag (like the photo), decorate it. Make tags for all the bags used in the album. These are great for journaling or more photos. (Like the photo)
Otro ejemplo: Another example:


En este album yo no pege las dos bolsitas junta, utilize el Bind It All de Zutton.
In this album I didn't glue the two bags together, I used the Bind It All from Zutton.


Album1 completo con su tarjeta de regalo.
Finish album 1 with gift card.

Otro album 2:
Another album 2:

Challenges for album 1
WOW...this is a very pretty, colorful paper bag album. I have made one before and had one gifted to me. They are a lot of work but so much fun to make and even more fun to receive. Love the colors you have chosen...so spring like. I saw your post on MIM and had to stop and visit.
ResponderEliminarabsolutely beautiful! thank you for joining the "anything goes" challenge at the cheerful stamp pad! xo
ResponderEliminarGORGEOUS paper bag album!! All your details are extraordinary!! :)
ResponderEliminarThank you for playing along with us at Make It Monday!
Remember, for a chance to win the prize from our sponsor, leave a comment for another entry and mention that you saw them on Make It Monday.
Lisa xx
Oh! WOW!! This is just fantastic, what a fabulous project, love all the colours and details..wonderful work.
ResponderEliminarThanks for sharing with us at ‘Make it Monday’
Luv CHRISSYxx
Don’t forget. .if you leave a comment on another entrant, mention that you saw their card on ‘Make it Monday’ for a chance at second prize.. the more you comment on and mention MIM, the more chances at winning second prize.
Hi Marie, wonderful projects. Love the baby one - so cute!
ResponderEliminarSarah
Gorgeous mini album. They are such fun to make arn't they.
ResponderEliminarThanks for joining us this week at Diva's and dont forget if you join in the blog hop there is a chance to win even more lovely prizes
Good luck
Jayne
x
wonderful paper bag album!!!! tons of flowers go well with our flower challenge!
ResponderEliminarthanks for partying with the Party Planners this week!
Holly PTT DT
Fabulous projects hun!! love them both!
ResponderEliminarThanks for joining us at Diva's this time hope to see you next time too
hugs
laney
This is stunning! What a great job you have done!
ResponderEliminarThanks for joining us at Anything Goes!
Hugs Annette
Marie you did an amazing creations... Love it!
ResponderEliminar*Eso me recuerda que tengo bolsitas para hacer albums, solo he creado uno y fue para regalo (perdi las fotos)
Sigue que vas bien, suerte y exitos.
-Sony
Sonia-Studio60
Ese sapito lo tenia, pero esta en el disco duro que se daño y que todavia no hemos podido hacer nada con el.
ResponderEliminar